


Contents
- How to test internet speed
- Accessing your router settings
- WiFi speed improvements
- General speed improvements
How to test internet speed
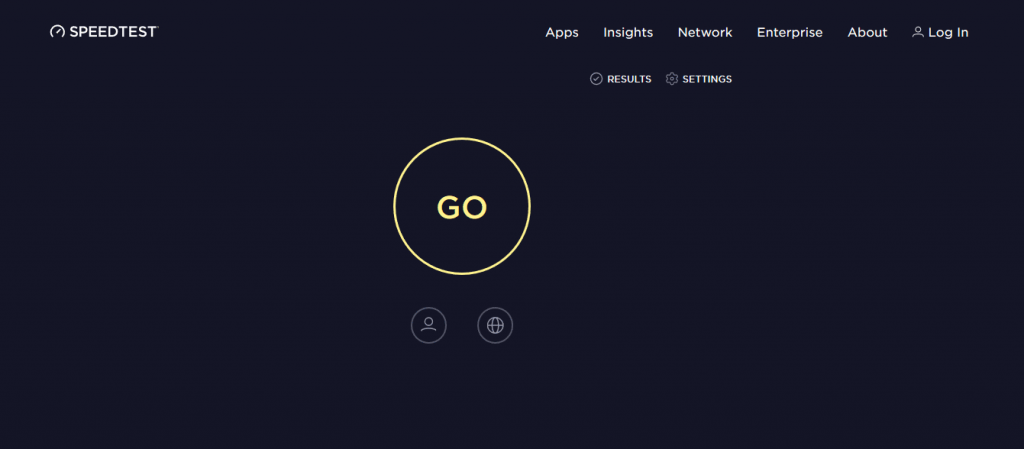
To find out how slow your broadband actually is, you’ll need to run an internet speed test to get a baseline reading.
Visit speedtest.net (or download the app) and click the big yellow “Go” button.
Once the test has finished, you should see something like this:
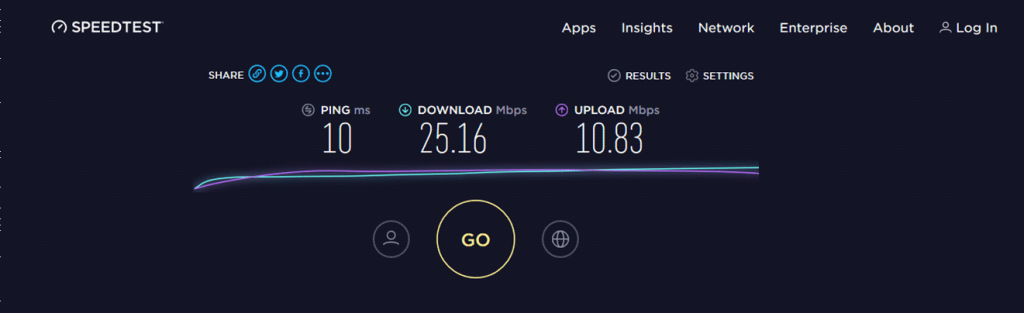
What does this mean?
- Your ping measures how quickly you get a response from the test server. Lower is better – less than 30-40ms is good.
- Download speed is how quickly your internet will download data, like video files. Higher is better – 50 Mbps is good, 100 Mbps or more is great.
- Upload speed refers to how fast your connection can upload data to the internet. The higher this is, the quicker your Instagram/Snapchat story will upload.
- Mbps means megabits per second. 8 megabits = 1 megabyte. Remember that Mb means megabits and MB means megabytes. Most speed tests measure in megabits.
Note this result down somewhere, so that you can say for certain if you’ve made any improvements.
If your speed test is good but you still sometimes have issues with buffering, this could indicate that your internet is slowing down when others are using it.
Accessing your router settings
Some of the fixes in this guide will require you to login to your router settings on your computer.
If you’re not comfortable doing this, that’s fine – you can skip the methods that require changes to your router settings. It’s not as hard as it sounds though!
Open up a new tab and type your router IP into the address bar. Normally, it’s either 192.168.0.1, 192.168.1.1, or 10.1.1.1.
![]()
If you’re not sure what your router IP is, you’ll need to find it manually.
To find it on PC, open the command prompt by typing “cmd” into the start menu/search bar. Type in “ipconfig”, press enter, and look for the “Default Gateway”.
On Mac:
- Hit the Apple symbol and go to “System Preferences”.
- Click on “Network” and find your current connection.
- Press “Advanced” in the bottom right and select the TCP/IP tab.
- The default gateway will be listed as the router’s IP address.
The login screen you see will look different on each router.

Typically, the username and password combination is printed on a sticker located on your router.
How To Improve WiFi Speed
First, we’ll look at some WiFi-specific fixes.
Remember that your issue might not necessarily be related to WiFi signal, even if most of your devices are connected to your router via WiFi. So if the first 10 methods don’t work, it’s worth trying the general fixes we’ve outlined further down the page.
Some of these solutions (like upgrading your router) will require a bit of an investment. Feel free to try the free ones first before spending any money.
1. Switch frequencies
Most newer routers actually broadcast on at least two different frequencies. The two main ones are 2.4GHz and 5.0GHz, but some use 6.0GHz as well.
2.4GHz provides better coverage over long distances. But the 5.0GHz broadcast is generally faster.
To change, simply open your WiFi settings on your computer or phone and select the 5.0GHz network. You’ll most likely be on 2.4GHz by default.
If you only see one option, it’s likely that your router is combining the two channels, leaving it up to your device to decide which is best at any given moment.
To fix this, you can log into your router’s settings and enable WiFi splitting, if your router supports it. This splits the different frequencies into separate WiFi networks, allowing you to manually choose between them.

2. Change the channel
WiFi isn’t only broadcast on different frequencies – there are different “channels” too. If you live next to a lot of other houses/apartments, different routers can interfere with each other if they’re on the same channel.
Connect to WiFi on your phone and download the “WiFi Analyzer” app on Android or an alternative like “Network Analyzer Lite” on Apple devices.
Find this screen:
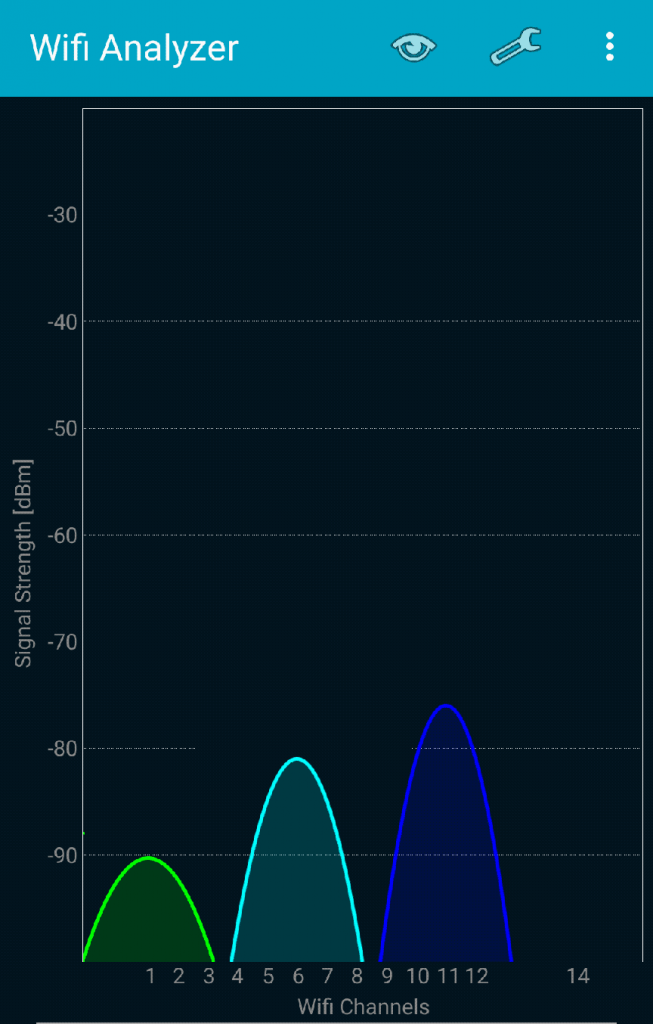
Ideally, your connection should be on a channel of its own, like all three of the WiFi routers (represented by the coloured curves) are in the image above. On other apps, this information may be displayed as a table rather than a graph.
If your connection is on the same channel as a bunch of others, you’ll need to login to your router settings and change the channel.
To do this, go to your wireless settings and choose a channel that doesn’t have any other access points using it, if possible. If there are no free channels, choose the one with the fewest other connections on it.
3. Improve your signal strength
Apps like WiFi Analyzer will also tell you how strong your WiFi signal is. In the screenshot above, you can see that the signal strength of the router on the right is better than the signal strength of the other two hotspots. This is because it’s the closest router to the phone that took the screenshot.
On Windows, you can also use the ![]() icon on the taskbar to tell how strong your signal is.
icon on the taskbar to tell how strong your signal is.
If you generally get quite poor signal, you can switch to the 2.4GHz wireless network, as it generally works better over long distances.
But if you’ve got a really big house, you might need to get a mesh WiFi system. These products give you the ability to place multiple WiFi access points around the property, helping you get better signal no matter where you are.
They can cost a decent amount, but are pretty easy to set up. If you’ve got signal problems and can’t find a better spot for your router, mesh WiFi is definitely worth a try.
4. Move your router
If you get poor signal but don’t want to invest in a WiFi extender, try and move your router to a new location.
The best places to put a WiFi router:
- Are close to the device(s) you want to use the internet on.
- Have a direct line of sight to the places you want to receive WiFi. Although routers can normally transmit through obstacles, they may struggle to broadcast a good signal through multiple brick/concrete walls.
- Don’t have many/any nearby devices that may cause interference (more on this below).
5. Eliminate interference
It’s not just your neighbours’ WiFi that can cause interference issues. Even items like microwave ovens and baby monitors can disrupt your signal.
Try and connect to the internet with all of the nearby electronic appliances turned off. If this helps to improve your speed, find a new place for your router away from these devices.
If you don’t want to move your router, do the test again, but turn each device back on one by one until the internet slows down. Once it does, move the offending appliance away from your router.
6. Check your WiFi receiver
It’s easy to blame your router for slow WiFi, but how well are your devices actually picking up its signal?
If you’ve got a piece of hardware that’s over five years old that always seems to have slow internet, it could be that its WiFi receiver is faulty.
This is more common to see on old laptops. Without getting too technical, every computer has a WiFi chip on its motherboard, to handle wireless internet. Sometimes, especially on older computers, these WiFi receivers can break, resulting in slow speeds or frequent dropouts.
To test how good your device’s WiFi receivers are, a good test is to take it to a friend’s house – preferably someone you know who has good broadband speed.
If it’s still slow, you might need to replace your device’s networking card or upgrade to a new piece of hardware.
7. Stop WiFi bandits
If someone else is using your WiFi they could be hogging your bandwidth, slowing your connection to a crawl.
Make sure you’ve set a WiFi password that’s really tough to guess – avoid using just your name, pet’s name or date of birth. Go ahead and change it in your router settings just to be on the safe side – the password reset field should be located in the wireless access point options.
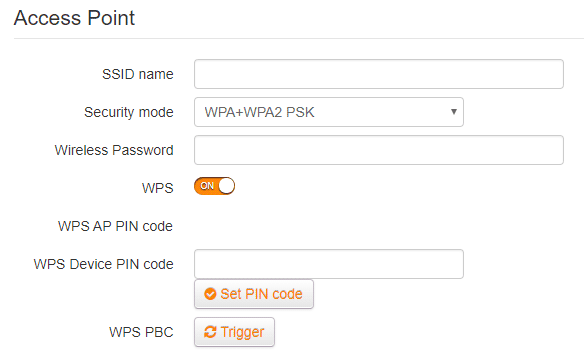
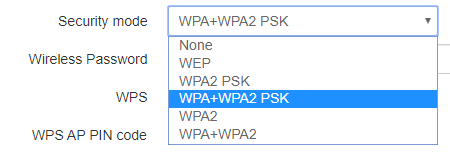
While you’re here, make sure your Wi-Fi security mode is set to one of the following (in order of preference):
- WPA3 (best option, if supported by your router and devices)
- WPA2/WPA3 Mixed Mode
- WPA2-Personal (also listed as WPA2-PSK or WPA2 + AES)
Avoid using anything with:
- WEP
- TKIP
- “Open” (no password)
8. Get a better WiFi router
Some routers (particularly old ones) just aren’t good enough to provide a consistent WiFi signal.
If you’re still using an old router your ISP gave you, it might be time for an upgrade – especially if it’s more than 10 years old.
You don’t have to spend £200 on a new modem/router combo. Just look for something in the £50-£70 range from a trusted brand, like TP-Link, or Netgear. Once installed, you should notice better WiFi coverage and most importantly, faster broadband speeds.
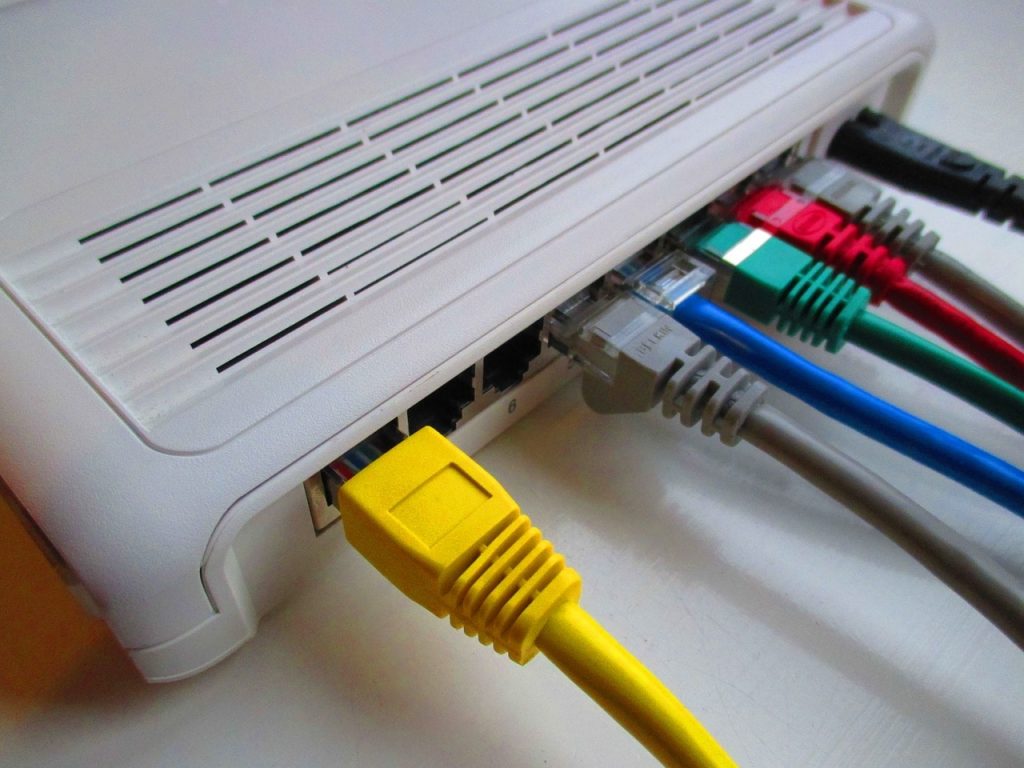
9. Switch to a wired connection
In some houses, there’s not much you can do to get better WiFi, except installing an expensive mesh system. Many people make the switch to wired connections because they’re often faster and more reliable.
You’ll need a separate Ethernet cable for each device you want to connect to your router. If you don’t have enough Ethernet ports on your router, you’ll need an Ethernet splitter or a switch to turn one port into two (or more).
Each device you’re going to connect will a) have to have a free Ethernet port and b) be close enough to your router for you to connect the two (unless you use powerline adapters – more on this below).

Going wired won’t be much help for phones or tablets though – they’re unlikely to have an Ethernet port.
10. Use a powerline adapter
Is your router too far away from your computer, Xbox or PlayStation to connect the two with an Ethernet cable?
To make the switch from WiFi to Ethernet without the need for a 30m long cable, you can use a handy gadget called a powerline adapter.
Basically, they use your electricity lines (that you’ve already got in your house) to transmit internet data. Don’t worry – this won’t disrupt your mains power supply.
Here’s how to set them up:
Normally they’re sold in sets of two, with two included Ethernet cables. You can buy more though to connect multiple devices to your router.
How To Improve Your Broadband Speed
No luck with any of the methods we’ve discussed so far?
If you’re still buffering all the time, read on to find some non WiFi-specific fixes.
11. Unplug (and plug back in) your router
Sometimes it’s the simple fixes that work really well.
If your router has been online for a long time, it might need a quick refresh to clear its caches, and boost its speed back up to what it should be.
Simply unplug the power cable on the router end. Wait a few minutes, and plug it back in again. Then try a speed test once you can reconnect to the internet.
12. Update your router’s firmware
To ensure your router is performing as well as it possibly can, you can update its firmware. Manufacturers typically issue firmware updates every few months to keep their hardware running as efficiently and securely as possible. Some modern routers will perform these updates automatically.
To install a new update manually, you’ll need to go to the manufacturer’s website and download the appropriate firmware file from there. Searching for “[your router brand + model] firmware” should help you find it.
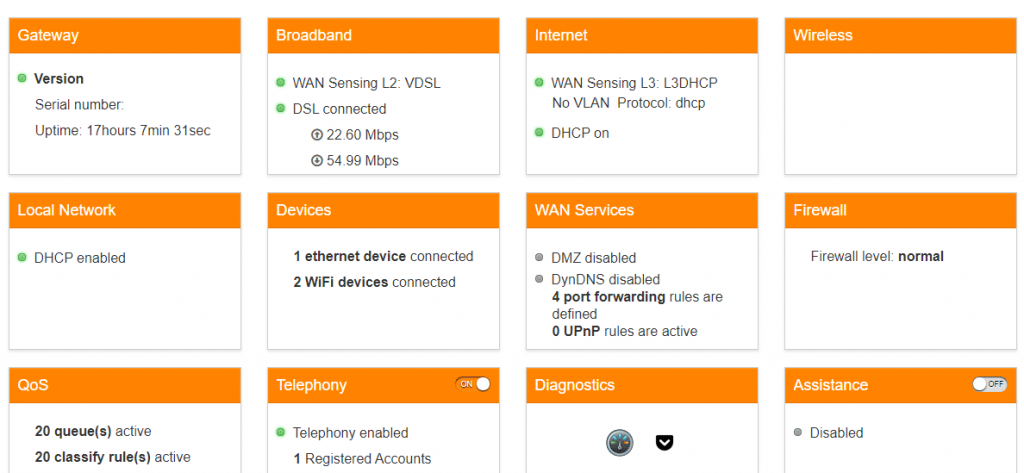
Next, login to your router and upload this file. Normally you’ll find the upload button under “gateway” or “firmware” settings. Consult the router manual if you’re having any trouble.
![]()
13. Do a factory reset of your router
This can sound scary, but it’s not so bad really. You’ll only need 15 minutes or so to reconfigure your router once it’s been reset. It’s definitely worth reading the manual first so you know what you’ll have to do to get the router back up and running.
To do the reset, look for a button on the underside of the router. You might need a paperclip to press it in.
This can improve your internet speed because over time, settings may have been changed which aren’t optimal for your current setup. Or, the router may have been configured incorrectly when it was first installed.
14. Use better DNS servers
When you visit a website, your computer sends the domain name (for example, google.com) to a domain name system (DNS) server. The DNS server will then return the IP address associated with the domain name, which the browser requires in order to be able to connect to the website.
Most routers will use the DNS servers that your broadband provider runs. However, sometimes they’re just unresponsive, or have really poor latency.
To resolve this, you can tell your computer or phone to connect to different, faster DNS servers.
Here’s how to do this on Windows 10. We’ll be using Cloudflare’s DNS server – 1.1.1.1 and its backup, 1.0.0.1.
If you don’t have a shortcut to your control panel on the taskbar like we do, simply type “control panel” into the start menu to bring it up.
On Mac, the process is pretty similar.
- Open system preferences.
- Look for “DNS servers” and select it.
- Click the “+” symbol and add both DNS servers individually (1.1.1.1 and 1.0.0.1).
On mobile devices, you’ll normally find the option in settings > WiFi/wireless. It might be located under an “Advanced” or a “DNS” tab.
15. Change quality of service (QoS) settings
This one is for those of you who notice your internet slowing to a snail’s pace when other family members get online.
Using your router’s QoS settings, you can tell it to prioritise your traffic, effectively giving your device or application a separate fast lane.
If your router has this function, login and find your QoS settings.
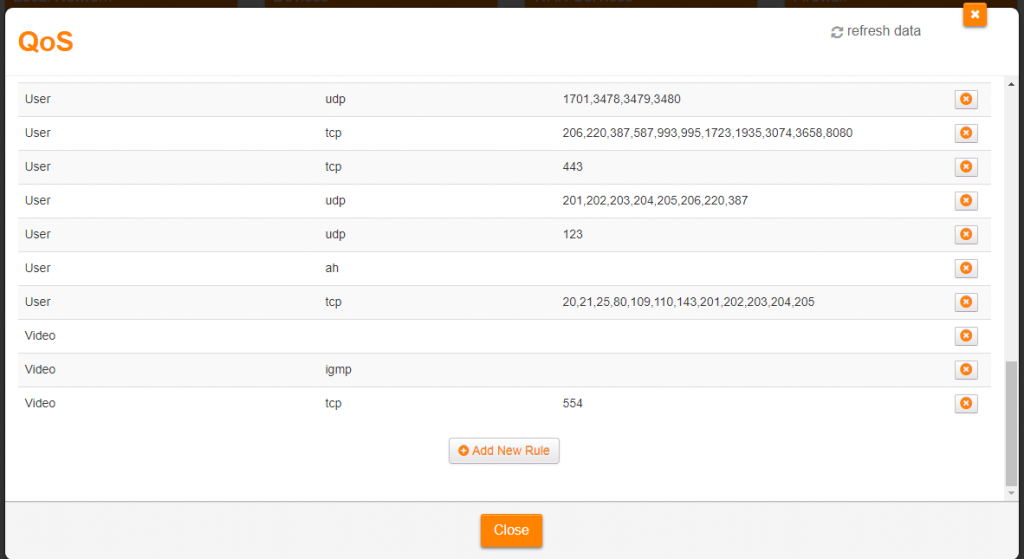
Don’t change any of the rules already defined. They help ensure video, VoIP and other traffic is prioritised correctly.
What you need to do next will depend on how your router’s QoS works.
On some routers, you can simply drag and drop different traffic types, like gaming, video streaming and bulk downloads, to create a list in order of priority.
You may also be able to prioritise by device. To do this, you’ll need the static IP address or MAC address associated with your specific console/computer/phone.
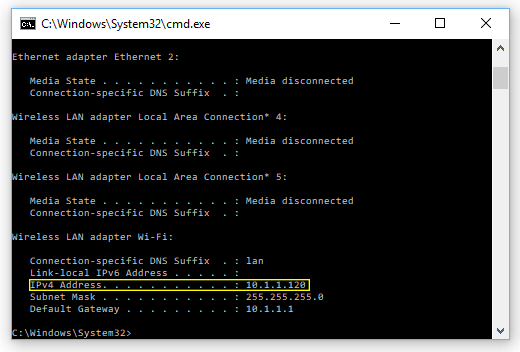
To find your static IP on Windows, open up the command prompt and type “ipconfig”. Hit enter, and look for “IPv4 address”.
On Xbox/PS4 and most mobile phones, you can find the static IP under advanced networking settings. On Mac OS, go to system preferences > network > your active connection (on the left) > advanced > TCP/IP – and then it’s displayed under “IPv4 address”.
Your MAC address on the other hand is normally found on a sticker on the outside of the device, but on smartphones you’ll have to look for it in advanced networking settings or in hardware info. Look for a string with six groups of two digits/letters, for example: “01-23-45-67-89-AB”.
Once you’ve got your static IP/MAC address (depending on what your router uses), add a new QoS rule. You may be able to tell the router to give your device a specific amount of bandwidth, or to prioritise it based on an ordered list.
Don’t put it above VoIP or other essential traffic types. Also, make sure you have your old settings noted down in case you need to return to them if there’s no “reset to default” button. It’s also a good idea to consult your user manual because every router has a different way of handling QoS settings.
16. Disable background downloads or uploads
If your router doesn’t have a QoS feature, and you have a relatively slow broadband connection, you can free up bandwidth by disabling background updates and other downloads.
On Windows, press control + alt + delete (all at the same time) and click on “Task Manager”. Navigate to the “Startup” tab.
To do the same on Mac, go to System Preferences > Users and Groups. Then choose your user and click on the “Login Items” tab.
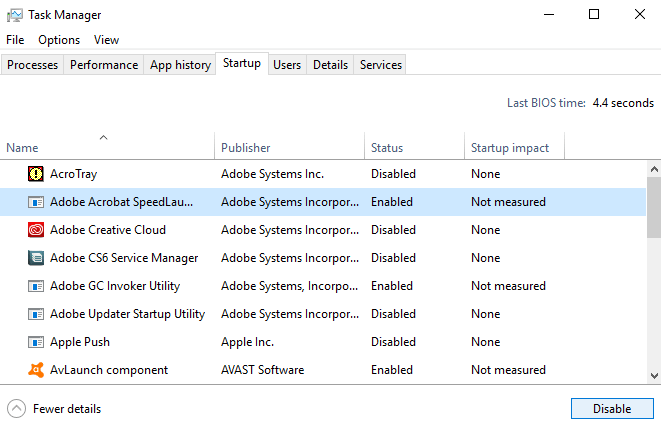
From here, click on any non-essential programs that are likely to use bandwidth in the background, and click “Disable”. For example, gaming clients like Steam may download game updates in the background, without you knowing. By changing this setting, you’ll stop these programs from opening on startup and hogging your internet while you use your computer.
You may also like to disable automatic updates on the App Store or Play Store on your phone. Instead, perform these updates manually – you might like to start them just before you go to bed.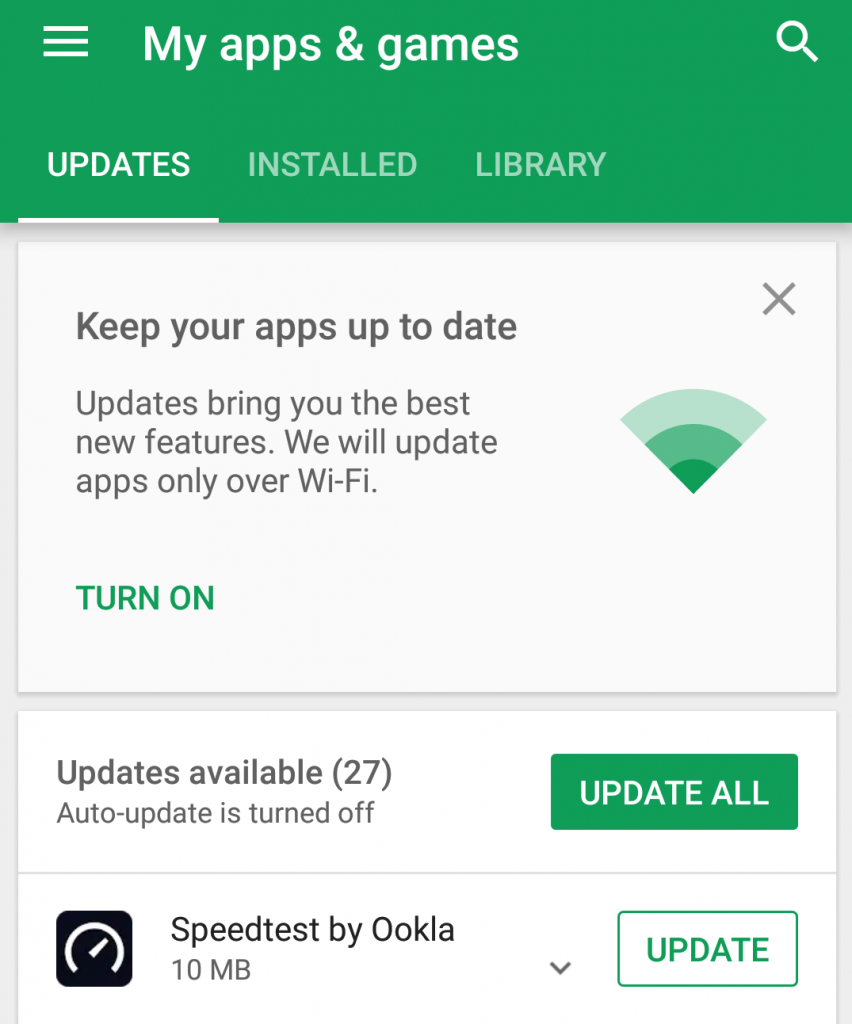
If you’d prefer to have anyone in your house be able to use as much internet as they want, whenever they want, you might want to consider upgrading your broadband plan.
17. Identify bandwidth-hogging devices
The truth is, it’s hard to know how much broadband your household devices are using when they’re switched on, and you can’t always control when they perform software updates. For example, smart home devices might use a lot of background data, with no option to turn this off.
Try turning off every single internet-connected piece of hardware in the house. This includes phones, FireSticks, smart TVs, games consoles – the lot.
Leave only your computer or phone on and do a speed test. If your speed improves, you now know that network congestion is what’s causing the issue.
To fix this, you have a few options:
- Leave every device off unless it’s being used.
- Set up QoS settings (as we looked at above).
- For each device, turn it back on and then do a speed test. If you find a single piece of hardware that’s causing your problems, deal with it individually. Do some research on the device, and how it might be using bandwidth. If it performs frequent unavoidable automatic updates, you might want to leave it switched off when you’re not using it, or remove it from the network entirely.
18. Change your DSL filter

If you’re using ADSL instead of fibre broadband, your router might require the use of a little box called a filter (sometimes called a microfilter).
It sits in between the phone socket and your router – one end plugs into the wall and the other into your modem. These filters help to remove phone line noise and prevent broadband interference.
Make sure that you’ve got a filter installed for both your phone and your modem (you can use the same filter for both). Also, ensure that your filter is the right type (ADSL or ADSL2+) – some will work with both.
19. Upgrade your cables

Most people (ourselves included!) are using Ethernet cables that are so old no-one remembers where they came from.
If you’ve got ancient cables, it might be worth upgrading. Be sure to replace the one connecting your fibre broadband port or phone socket to your router, and the ones connecting your router to your computer/other devices.
Look for Category 6/6a/7 Ethernet cables when shopping online. Each category (often abbreviated to “Cat”) refers to certain strict specifications that the cable must be manufactured in accordance with. Cat 6 for example will transmit data at up to 10Gbps, which is plenty fast for most households.
The higher the category number, the better the cable. But be sure that you’re buying from a reputable seller, to ensure you’re getting the cable specs you’re paying for.
20. Ensure you’re not dropping out
Also make sure that your Ethernet cables aren’t too long – data can begin to drop out over long distances. This will force your computer to have to wait for lost TCP packets to be retransmitted, slowing you down significantly.
Cat 5e or higher cables should be able to transmit data at full speed over 100 metres. However, if your cables are Cat 4 or lower, data might begin to drop out much sooner.
Consider getting a powerline adapter instead of using a super long Ethernet cable if your speeds and latency are suffering. To test if this is the cause of your slow internet, try putting your device next to your router and connecting the two with a much shorter cable. Then do a speed test and see if it’s any faster.
21. Try combining multiple internet connections
Get this: you can combine the bandwidth of multiple internet access points, allowing you to create a single ultra-fast connection.
Speedify is a software application (available on PC, Mac, Android and iOS) that allows you to combine your WiFi, Ethernet, 4G/5G, dongle, satellite, and public hotspot connections. By utilising all of these streams at the same time, it allows you to download (and upload) data much faster than using a single connection would allow.
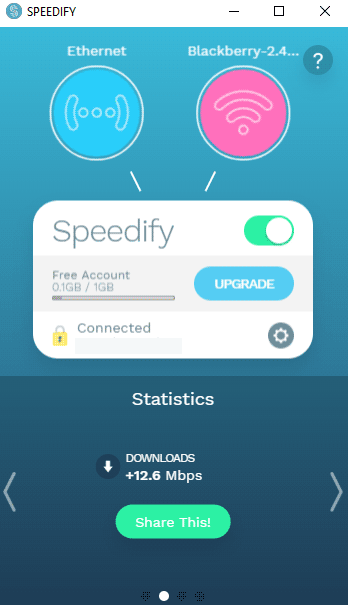
This is the free version, but you can prioritise certain networks on the paid program to avoid using up too much mobile data.
For example, you could combine an unlimited data SIM plan with a fixed-line broadband plan, to help you get better speeds.
22. Scan for malware
If you’ve got any sort of malware installed, no matter how serious, it’s likely to be using up a good deal of bandwidth. Hackers often use infected PCs to perform activities online, like mining Bitcoin or visiting websites as a part of a DDoS attack.
To scan your computer for infections, download and install the free version of Malwarebytes.
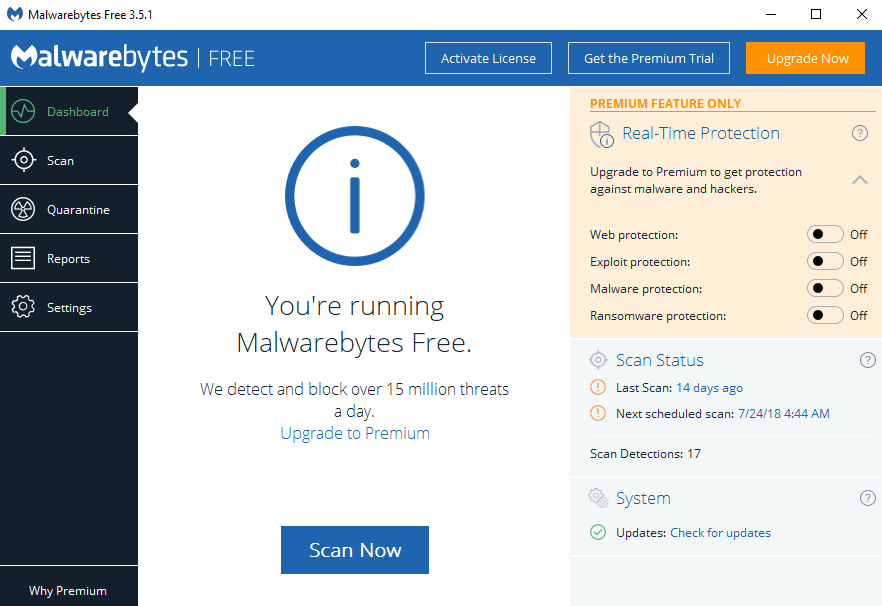
Once it’s installed, click “scan now” and leave it for a little while to do its thing.
When it’s done, it’ll display a list of potential malware.
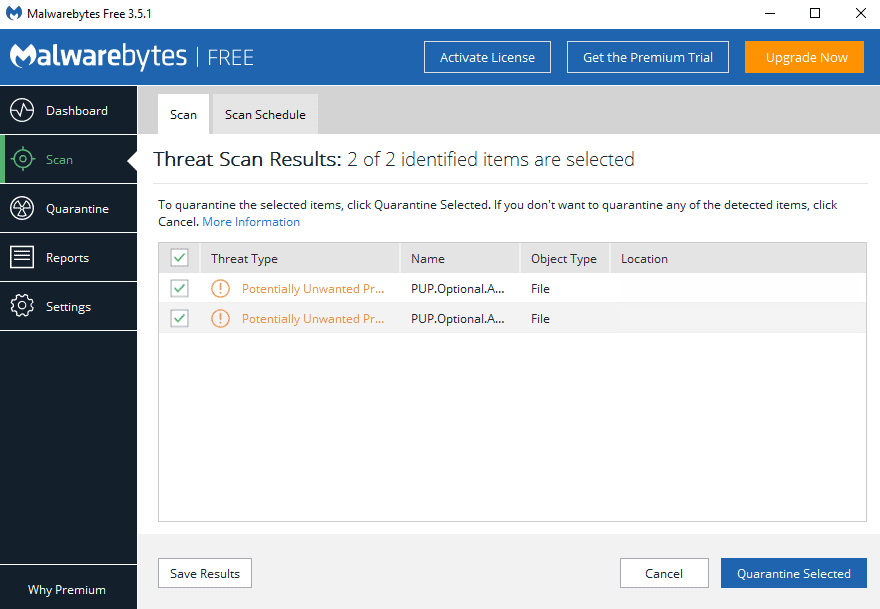
Hit “Quarantine Selected” unless you’re 100% sure the file is safe.
On this computer, Malwarebytes detected a “PUP” – a potentially unwanted program. These aren’t normally dangerous, but can slow your computer down, so it’s a good idea to remove them.
23. Upgrade your browser
Not all web browsers are created equal.
On computers, Google Chrome and Mozilla Firefox are generally the fastest options.
On mobile devices, there are certain browsers like Brave that block ads automatically, which can make web pages load much more quickly (more on this below).
24. Install an adblocker
Internet ads aren’t just annoying, they also use up heaps of bandwidth. Video ads and popups in particular can make certain pages really slow to load.
To block them from showing up, consider installing an adblocking extension. The best one in our opinion is UBlock Origin. It’s available for Chrome, Firefox, and Microsoft Edge.
If you’re browsing on a mobile or tablet, download the Brave browser from the App Store, as we mentioned above, to block ads on any websites you visit.
25. Clear computer/browser caches
Caches are file repositories designed to speed up your computer. However, if they get clogged up, they can actually slow you down.
To clear them all in one easy step, download and run CCleaner.
Use the checkboxes on the left to select what you’d like it to clean. Remember to check the options under the “Applications” tab too.
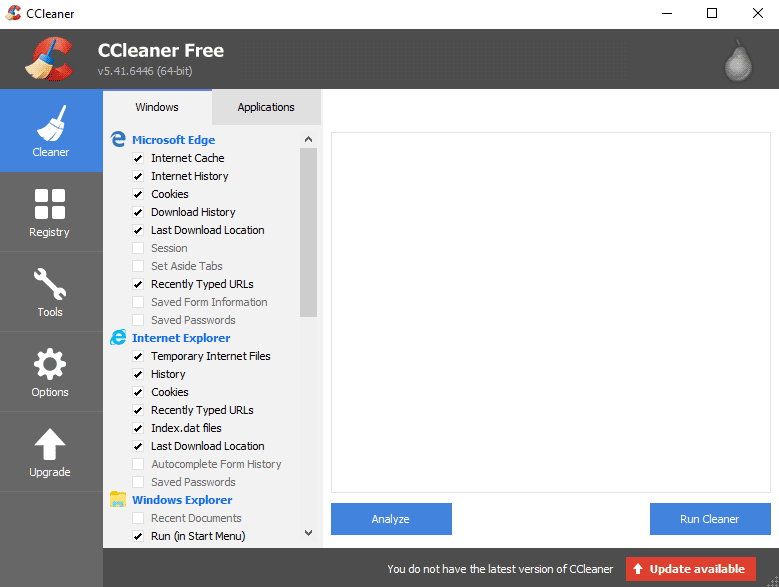
Click “Run Cleaner”.
If it removes more than 20GB or so, this should perk your browser up and improve your speed a fair bit.
26. Remove unnecessary browsers toolbars and extensions
Any browser extension you have installed makes for another thing your browser has to load every time you visit a new web page. If you have more than one or two add-ons installed and your PC is fairly old, chances are this is slowing your browsing down considerably.
To remove unwanted extensions and toolbars, navigate to your browser extension/add-on settings.
On Firefox, type “about:addons” into your address bar. If you’re using Chrome, go to “chrome://extensions”, or “edge://extensions/” on Microsoft Edge. You can then choose add-ons and toolbars to disable.
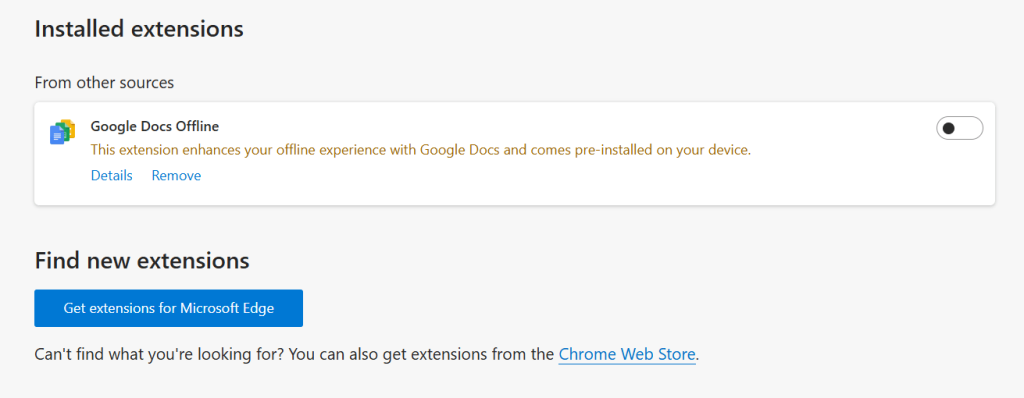
You’ll want to get rid of any extensions you’re not using on a daily basis. For most people, from a speed point of view, the only add-on you’ll want to keep installed is an adblocker.
27. Remove unnecessary software
Like toolbars, unnecessary programs can slow down your browsing, especially if they’re related to your internet use.
- On Windows, navigate to the control panel, and select “Programs And Features”.
- On Mac, open Finder (the smiley face), and click on “Applications” on the left.
You should see a list of all currently installed programs. Click on an application and follow the prompts to uninstall it.
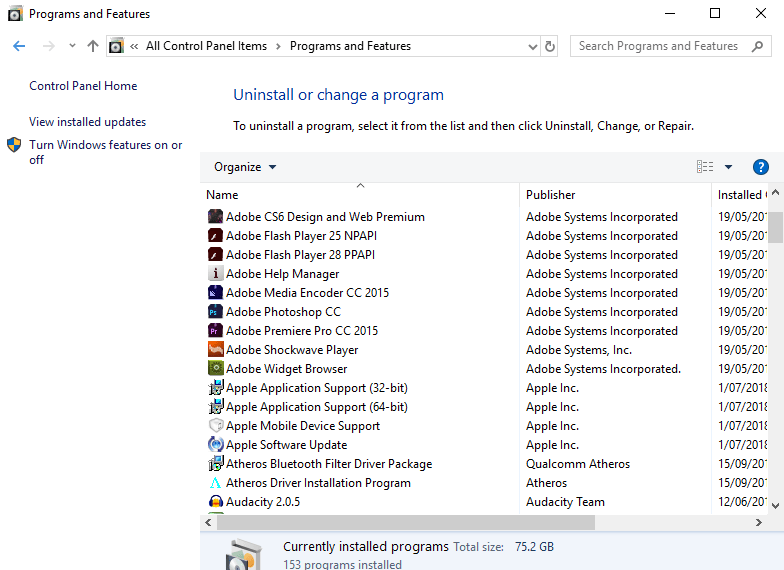
You’re safe to uninstall most software you don’t regularly use, but remember:
- In general, it’s a good idea to keep anything installed by Intel or Microsoft, or Apple on Mac computers. Software like the .NET frameworks is normally necessary for certain programs to run.
- Any other programs you don’t recognise, it’s a good idea to research them before uninstalling, to avoid removing software you need.
28. Update your apps
On mobiles and tablets, it’s possible to continue using the old versions of certain applications indefinitely.
This could be slowing you down significantly, as old apps may be poorly optimised by modern standards.
Navigate to the Google Play or App Store and update any applications you use to access the internet. Don’t turn automatic updates on though. If you do, your device will be frequently downloading patches, which could slow your internet right down.
29. Upgrade your device

If you’re running hardware that’s 10 years old or more, it’s possible that it’s simply incapable of handling modern internet speeds.
To test if it’s really your phone/computer holding you up, try and see how fast your speed test is compared to a more modern device using the same connection. If it’s much slower, it’s probably time for some new hardware.
Note that some old devices might record a good speed test, but browsing will still be really slow. This is because their hardware is simply incapable of handling modern web pages, despite the machine having access to a high-quality broadband connection. So if the speed test seems fine but everything is actually really slow, you may still need to upgrade.
If you don’t want to buy a new computer/phone just yet, try uninstalling unnecessary software, clearing your caches, and upgrading to a better browser (as we talked about above). It might be software issues rather than hardware problems that are slowing your old device down.
30. Make sure you haven’t hit your usage cap
Most broadband plans used to be sold with a monthly bandwidth cap. If you hit it, your internet would be slowed down tremendously until the end of the month.
Nearly all plans sold in the past 10 years should provide unlimited data. But if you’ve had your plan for longer than this, there’s a chance you’ve still got a cap.
Log into your account on your internet service provider’s website or ring them to see if you’ve got a monthly limit.
Also note: usage limits are much more common when using 4G or 5G internet, instead of fibre broadband.
31. Call up your ISP
If none of the above works, it could be that your internet service provider isn’t providing as much speed as you should be getting. This could be for a number of reasons.
Commonly, people experience super-slow speeds in the evening, when everyone in the neighbourhood is online. This happens because the ISP isn’t providing enough bandwidth for everybody to use at the same time.
They may say that other factors could be causing the problem, like poor WiFi signal. But if you’ve already tried our methods to solve common internet speed issues (like testing using an Ethernet cable), the issue is likely to be something on your broadband provider’s end.
Good ISPs will arrange to perform a line test once you call them. This means they’ll check for faults with your physical connection, and if there are any issues, they’ll send an engineer over to check the cables for damage.
If your provider makes excuses or simply won’t give you what you’re paying for, you can lodge an official complaint with their complaints department. If this still doesn’t work, you can escalate the issue. Ofcom has a handy guide explaining what you should do in this situation.
32. Change your broadband plan

If your current provider won’t fix the problem, it’s probably a good idea to switch to a company that’ll give you the service you’re paying for.
Similarly, if you’ve found that you’re receiving the speed you’re entitled to but it still isn’t enough, you’ll want a better plan to stop those HD streams buffering.
Look for fibre plans, especially those that offer an average speed of at least 70-100Mbps. Also check out customer reviews of the provider, so you can get a good idea of how reliable they are before buying.
33. Talk to your neighbours/the council
Sometimes there’s nothing your broadband provider can do to improve your speeds, because fast fibre broadband isn’t available in your street.
Around 85% of the UK now has access to ultrafast gigabit broadband, but there are still many homes that miss out on fast speeds, especially in rural areas.
It can be worth asking around town, or on your local Facebook group, to see if there are any alternative ways of getting online. For example, there might be a smaller provider that is rolling out fast fibre in your town or village, or people might be using 4G or 5G internet to get online instead – which we’ve discussed in more detail below.
If you have no luck with this, contact your council and ask them about the infrastructure in your area. See what their plans for the future are regarding upgrades, if you still can’t get superfast or ultrafast fibre broadband where you live.
34. Switch to 4G or 5G internet
If there won’t be any infrastructure upgrades in the near term, you may be better off using a wireless dongle, MiFi device, or 4G router to get online.
Mobile broadband solutions connect to the internet just like your phone does, using 4G or 5G. However, you get a dedicated device that takes a SIM card, then either plugs into your computer, or creates a wireless hotspot. As a result, you can access the internet no matter where you are (as long as you have signal).
There are a few potential downsides to using this way of getting online:
- It may be more expensive.
- It can drop out more often (depending on how strong your signal is).
- There may be a monthly data usage limit, although solutions like the Three 5G Hub come with unlimited usage.
If you’re using mobile data but still get slow downloads, read our guide to improving 4G speeds.
35. Move house!

If neither your ISP nor the council will do anything about your slow speeds, and mobile broadband won’t work for you, moving might be your only other option.
In general, the fastest internet speeds are available in and around major cities.
Use this handy tool to find the average internet speed of nearly any postcode in the UK.
Conclusion
You’ve reached the end of our guide!
Hopefully you were able to fix your sluggish internet. If you’re still having trouble, feel free to contact us.
If you’ve got another method for boosting broadband speeds that we haven’t mentioned, we’d love to hear it! Drop us a comment if you’d like to share your secret to ultra-fast internet. 😉
Related posts


About the author

Tom is the founder of Broadband Savvy. He has more than five years’ experience writing broadband tutorials, reviewing routers and internet service providers, and explaining broadband-related concepts. Tom is experienced as a writer, and also produces videos for the Broadband Savvy YouTube channel.
He currently specialises in writing content for Broadband Savvy designed to help people understand broadband jargon and terminology, increase their download and upload speeds, and improve their Wi-Fi connectivity. Tom also occasionally contributes to buyer’s guides and review articles on Broadband Savvy, utilising his knowledge of the broadband market in the UK.
When he’s not writing about broadband, you’ll find him walking his dog (Rex) or playing agar.io.