Contents
Measuring WiFi signal
Before you begin to try and improve your signal, it can make sense to map out where your WiFi is at its worst, so that your fixes can be more targeted.
To do this, you can use our Signal Test app if you have an Android phone.
Once you install the app, tap the WiFi button on the bottom right, and you’ll see your WiFi signal graded in real-time, on a scale from 0 to 100.
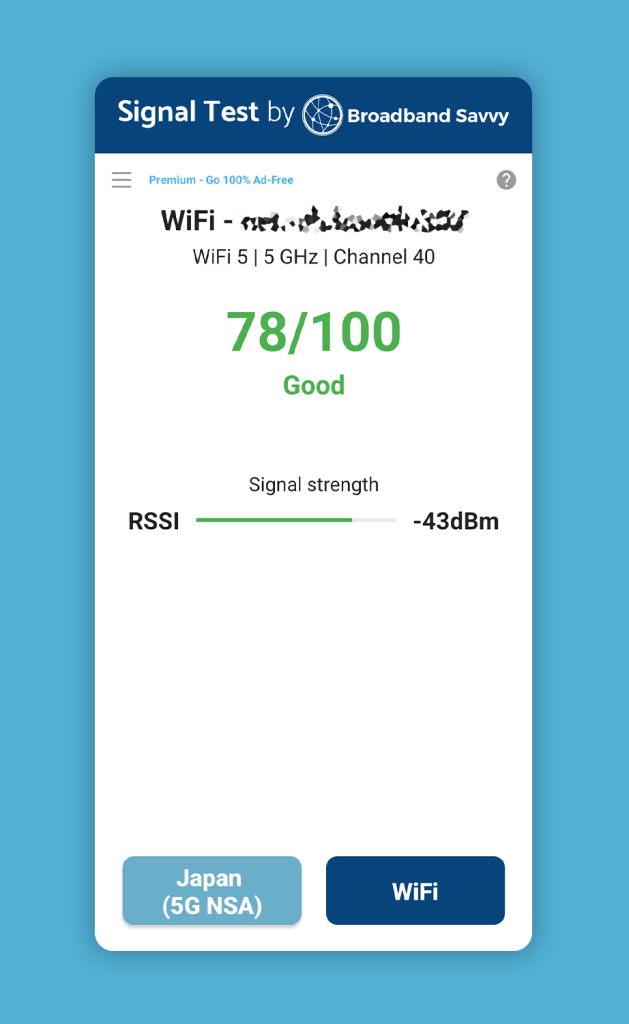
Move around the house and look for WiFi weak spots on the app, especially areas where your score drops below about 20 out of 100.
At times, you can use this information to work out why your WiFi signal is poor in places, such as due to interference, as we have explained how to do later on in the article.
You can also use the app to get an idea of whether your fixes have helped to improve your WiFi signal, after trying some of the methods we’ve mentioned below.
We also recommend performing speed tests in areas of potentially weak signal, because signal strength on its own does not paint a complete picture of WiFi performance. At times, it is possible to have fairly weak signal but still get fast speeds – just your speeds might be less consistent than if your signal were perfect.
Logging into your router settings
Some of the fixes we’ve described below require logging into your router’s admin settings panel.
To do this, you need to type in your default gateway IP address into your web browser address bar, and navigate to it.
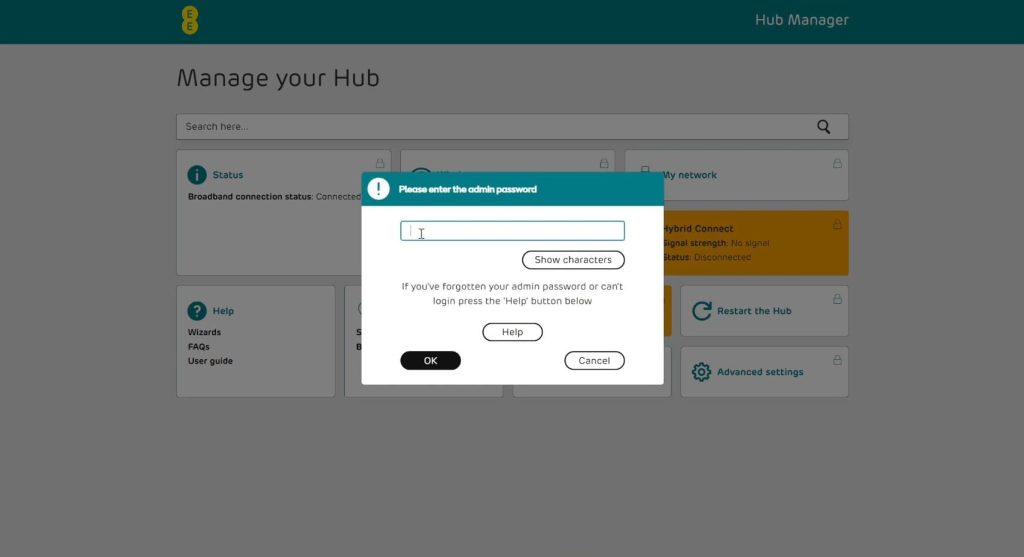
Then, you can log in using the password printed on your router.

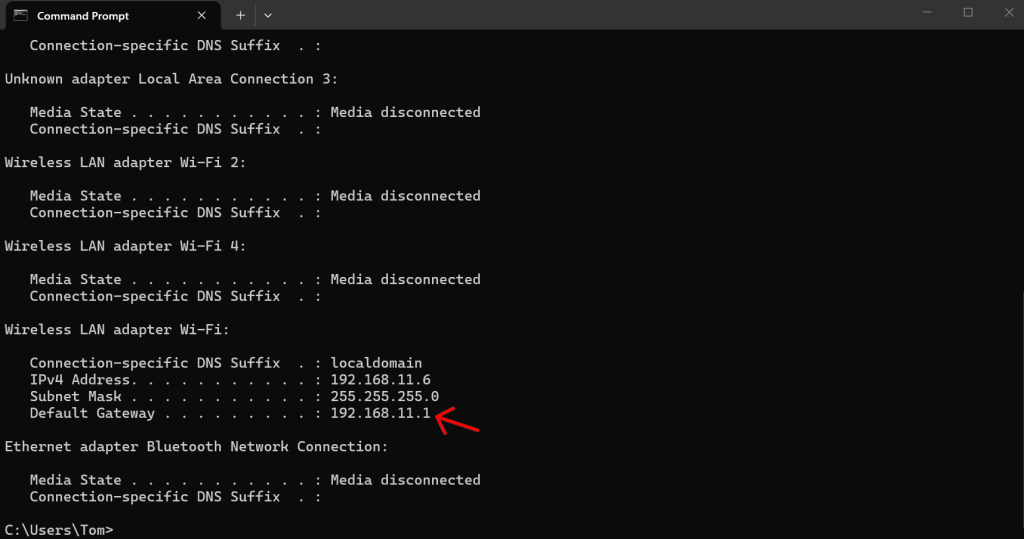
Your default gateway IP address usually looks something like 192.168.0.1, or 10.1.1.1.
To find it on Windows, open the command prompt by typing “cmd” into your search bar, and pressing Enter. Then, type in “ipconfig”.

Press Enter, and look for the IP address next to “Default gateway”.
On Mac, go to System Settings > Network, and choose your internet connection. Then, click Details > TCP/IP, and look for the IP address listed.
How to improve WiFi signal
1. Reboot your router
This is a very simple solution, but it’s often one of the best things you can do for your WiFi signal.
Restarting your router gives it a chance to reset how it is broadcasting WiFi, and also resets its internal traffic handling logic, which can help to improve your signal and speeds.
This isn’t always a magic fix, but given how easy it is to do, we always recommend trying this first.
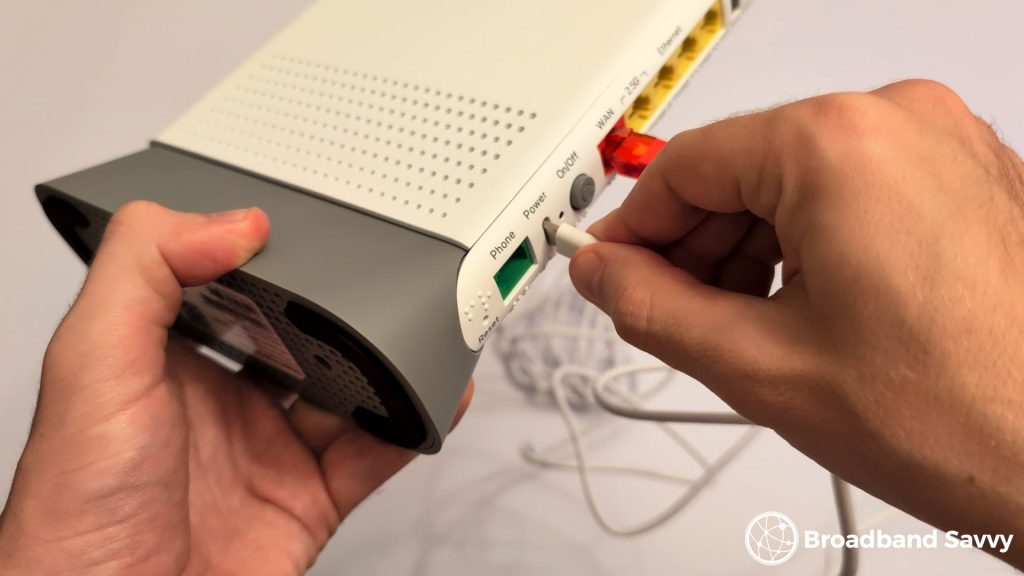
To restart your router, unplug it from power, wait 10-20 seconds, plug it back in, and then give it a minute or two to reboot before connecting back to WiFi.
2. Remove or avoid WiFi blockers
One of the most common causes of poor WiFi signal at short to medium distance is the signal being blocked.
WiFi signal is quite hardy, and can pass through most objects easily, but if there is a lot of dense material in the way, this can affect your signal.
The most common culprits are:
- Brick internal walls.
- Ceramics and concrete.
- Large fish tanks and vases, or any other containers of water.
- Large amounts of glass or metal, such as radiators.
The good thing is, most of these potential blockers are quite easy to avoid by placing your WiFi router on a table that’s at least knee high, rather than on the floor or near these types of objects.
Normally, it has to be quite a large fish tank or glass/metal object for this to significantly affect your WiFi signal.
The most problematic signal blocker in most cases is the physical aspects of your building, such as walls, tiles and so on that WiFi has to pass through.
In this case, you might need to work around the object using mesh WiFi, or by repositioning your router, both of which we have discussed later on in the article.
3. Eliminate interference
As well as your WiFi being physically blocked, it can also be interfered with by other devices that emit radio waves.
This could include things like:
- Microwave ovens
- Radios
- Baby monitors
For this to be an issue, the offending device has to be quite close to the router. So if you have your router in the main hallway and your microwave is in the kitchen at least 5-10 metres away, this shouldn’t be a problem.
The most common situation where interference occurs is when you have a device like a baby monitor right next to the router. When it is in use, this can affect your WiFi signal.
Therefore, it’s best to keep the space immediately beside your router (or any mesh units) clear of other electronic devices, especially those that emit radio waves.
4. Reposition your router
Many people don’t think to do this, but often one of the cheapest ways to get better WiFi signal is to reposition your router, especially in larger houses.
Most people have their routers located right by where their broadband comes into the house, usually by the front door.
However, Ethernet signal does not degrade until the cable reaches 100m or so in length. Therefore, there is nothing really stopping you from running a long cable from your broadband socket to somewhere more central in the house, allowing you to reposition your router to get better WiFi signal.
The best place for your router is somewhere central, relative to where the devices are that you get online from. This can be an upper storey if needed – signal will be weaker downstairs, but it will still be usable.
Once you choose a position, put the router ideally at about chest height, or at least at knee height, rather than on the floor if possible.
The main consideration in doing this is managing the cable and how it appears visually. You may like to put it along the top of the skirting board (using a white cable) or buy a flat cable and put it under the carpet to keep it out of sight.
5. Change WiFi channels
WiFi interference can also be caused by other WiFi hotspots located nearby.
To try and overcome this, most WiFi routers have the ability to broadcast signal on multiple different WiFi channels.
Your router will scan other hotspots it sees, and then try to automatically choose a good channel with less interference to use.
The problem is, some routers don’t do a very good job of this. They may not adapt quickly enough when other hotspots come online or switch channels in your area.
If you live in an urban or heavily built-up area, it could be that other hotspots in your neighbourhood are crowding out your WiFi network, affecting your speeds and consistency.
To fix this issue, first, use an app such as WiFi Analyzer to see channel overlap in your area.
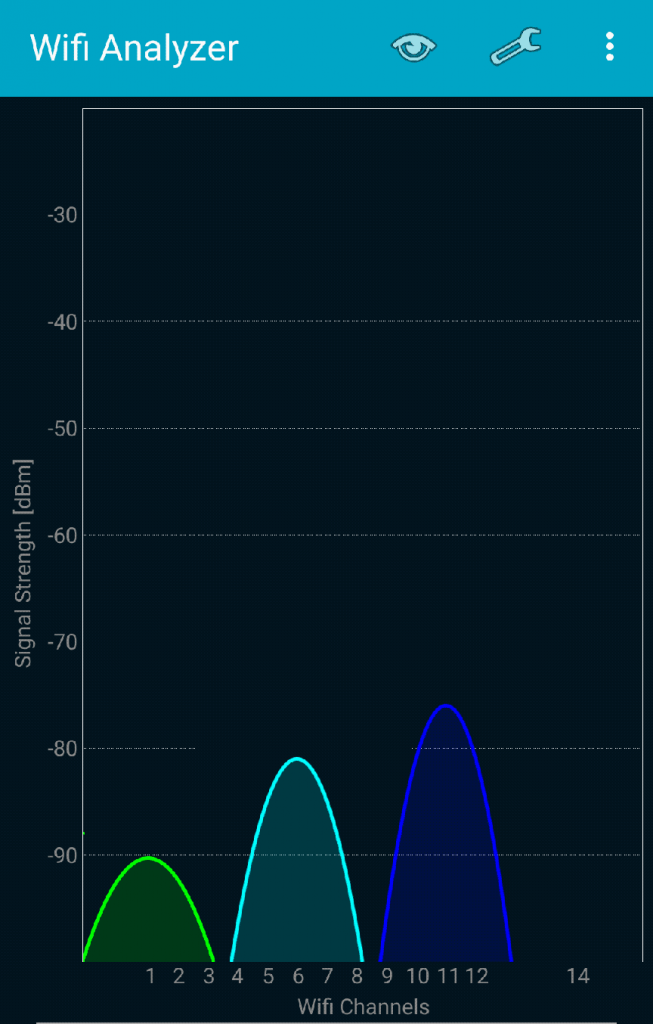
Each curved line shows a WiFi network. The height of the line shows its signal strength, and the numbers along the bottom show which channel they’re using.
In this case, there is no overlap. But if the line associated with your network was heavily overlapping with other ones, it might make sense to change the WiFi channel you’re using.
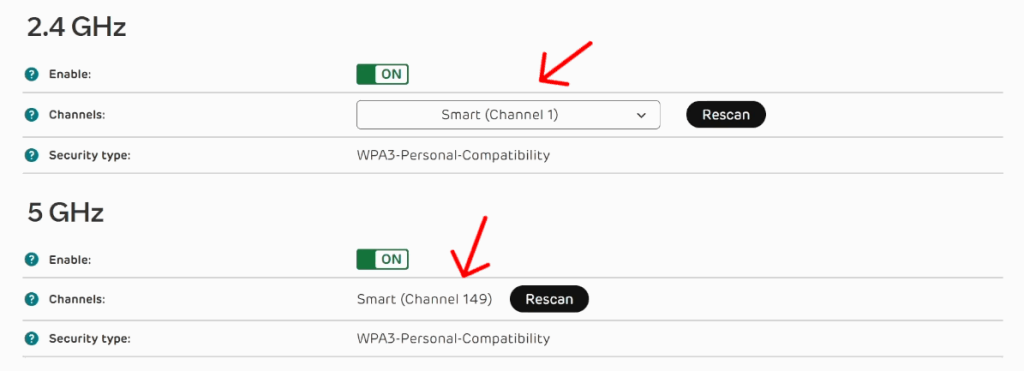
To do this, log into your router’s admin portal, look for WiFi settings, and change the channel to one that looks free according to the WiFi Analyzer app.
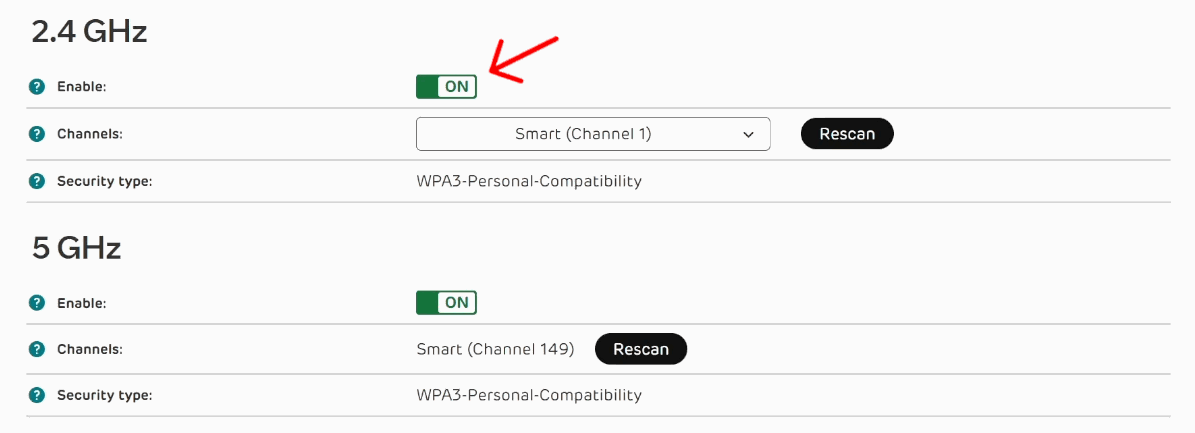
6. Change WiFi frequencies
As well as using different channels, WiFi routers also broadcast on different frequencies as well.
Nearly all routers use a combination of 2.4 GHz and 5.0 GHz frequency bands. More modern routers also broadcast on 6 GHz as well.
The higher the frequency, the faster the connection will be. However, lower bands are less prone to interference.
If you think your signal is being blocked or interfered with, it makes sense to use a lower frequency. But if this isn’t the case, and you have a speed issue, using the 5 GHz or 6 GHz band makes the most sense.
The problem is, switching frequencies can be a bit tricky.
Most modern routers automatically allocate your connection to the band that they think is best, all under a single wireless access point.
Sometimes, you can turn this off, and tell your router to broadcast its different bands under different SSIDs, allowing you to control which band each device is using.
Other times, the only thing you can do is turn off one of the frequencies in the admin settings. This is most likely the case on older or provider-supplied WiFi routers.

This is less convenient than having both bands available to choose from, but is worth trying to get better speeds.
Remember, turn off 5 GHz if you want the most stable, consistent connection, or turn off 2.4 GHz if you want the fastest possible speeds and aren’t facing interference issues.
7. Use mesh WiFi
This method requires a bit of investment, but is often the best way to get perfect WiFi signal at home, no matter the size of your house.
Mesh involves using a system of extenders that replace your current WiFi router, giving you wireless access points throughout the house.
The first unit plugs into your broadband socket, just like your current WiFi router.
Then, the other units communicate with the first one, either wirelessly or connected via Ethernet cable, and broadcast WiFi signal.
The whole mesh system uses the same WiFi network, so you don’t have to worry about using different hotspots across all of your different laptops, phones, and tablets.
As they move around the house, your devices will automatically connect to the mesh unit with the strongest signal.
Mesh WiFi is normally sold in kits of two or three units, but you can use as many as you need, depending on the size of your house.
For a four bedroom, two-storey house, three mesh units should be plenty.
8. Upgrade your router
In smaller properties, you might not need a mesh system. Instead, you can potentially just get better WiFi signal by upgrading your router itself.
This is especially likely to help if you are using a fairly old router supplied by your broadband provider.
By upgrading, you can get something newer with WiFi 6 or WiFi 7 tech – the latest standards – and improve your signal and speeds.
This will require a bit of investment, but is generally cheaper and easier to set up compared to getting a mesh WiFi kit.
If you’re considering switching broadband provider to get better WiFi tech, and potentially better value for money as well, read our guide to the best broadband deals on the market at the moment.
9. Switch some devices to Ethernet
If you’re not using the latest WiFi tech but have quite a lot of devices on the hotspot, you can give your WiFi network some breathing room by switching certain devices to use Ethernet instead.
By plugging devices into the router directly, you can get faster, more consistent speeds on that piece of hardware, and reduce the strain it is putting on your overall WiFi network, if it often requests large amounts of bandwidth.
Essentially, if your router isn’t using the latest standards like WiFi 6 or 7, performance can become less consistent during times of high bandwidth usage, as the network becomes flooded with traffic.
Therefore, it can make sense to remove certain devices from WiFi, in order to get better speeds on other tech that relies on the hotspot.
The best devices to do this with are computers and games consoles, partly because they have Ethernet ports (unlike phones and tablets) but mostly because they usually put the most strain on your WiFi network – downloading and uploading large files to the internet.
If you use mesh WiFi, you can plug devices directly into the LAN port on a nearby mesh node to take them off the hotspot.
But if you’re using just a single router, your devices might be too far away to plug them in directly.
In this case, you can potentially use a powerline adapter to bridge the gap.
This is a device that helps broadcast internet signals through your house’s electricity cabling, without performing any modifications to your property, and without affecting your home’s power supply.
See the video below to learn how to get set up with powerline adapters.
Related resources

How To Get Faster Speeds With 4G/5G Broadband
Learn how to get faster, more consistent download and upload speeds when using 4G or 5G broadband at home.
5G Broadband vs Fibre Internet | What’s The Difference?
Learn about the difference between 5G and fibre broadband. Discover whether you should choose fibre or 5G internet for your household.

5G Broadband vs Starlink Satellite Internet | Key Differences
Learn about the differences between 5G broadband and Starlink internet, when it comes to speeds, latency, cost, and more.

What is MiFi? 4G/5G Mobile WiFi Devices Explained
Learn more about MiFi devices and how they work. Discover if a mobile WiFi router is the right way for you to get online.

Tom is the founder of Broadband Savvy. He has nearly 10 years’ experience writing broadband tutorials, reviewing routers and internet service providers, and explaining broadband-related concepts. Tom is experienced as a writer, has appeared on national radio and in national newspapers, and also produces videos for the Broadband Savvy YouTube channel.
He currently specialises in writing content for Broadband Savvy designed to help people understand broadband jargon and terminology, increase their download and upload speeds, and improve their Wi-Fi connectivity. Tom also occasionally contributes to buyer’s guides and review articles on Broadband Savvy, utilising his knowledge of the broadband market in the UK.
When he’s not writing about broadband, you’ll find him hiking somewhere or playing on his Nintendo Switch.